Bare-metal installation for Nginx and Jekyll
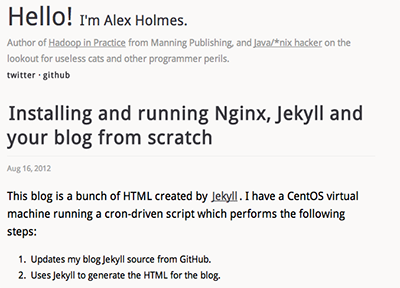
This blog is a bunch of Jekyll-created HTML which is served by the Ngix HTTP server. This post documents the process of getting Jekyll and Nginx setup from bare metal. It also shows a script being used to periodically pull and generate your blog from GitHub sources. The instructions that follow should work for RedHat 6 and derivatives (such as CentOS 6 which is what I’m using).
Create a user and setup ssh
With a new VM you’ll typically be given root access, but security 101 dictates that you avoid running commands as the root user as much as possible. Therefore the first thing you’ll want to do is to create a user, in this case bloguser:
shell$ useradd bloguserNext, change the password for the user:
shell$ passwd bloguserNow you’ll want to create a SSH public/private key set for your user. It’s recommended that you do this on your own machine, not your VM, since you don’t want your private key out there if it can be avoided.
shell$ ssh-keygen -t rsaThis will generate the following files on your local host:
.ssh/id_rsa
.ssh/id_rsa.pub
Once these files are generated, create the .ssh directory on your VM (these steps assume you’re logged-in as root):
shell$ su - bloguser
shell$ mkdir .ssh
Create .ssh/authorized_keys on your VM, and copy the contents of .ssh/id_rsa.pub from your local host:
shell$ vi .ssh/authorized_keysSetup the permissions on the directory and file.
shell$ chmod 700 .ssh
shell$ chmod 600 .ssh/authorized_keys
Test out your ssh setup, by ssh-ing from your local host to your VM as the bloguser user:
shell$ ssh bloguser@<vm-host>As root, allow the bloguser user to perform commands as root (if the /etc/sudoers file doesn’t exist, then you will need to install sudo with the yum install sudo command).
shell$ vi /etc/sudoersAdd the following line:
%bloguser ALL=(ALL) ALLSetup some basic security
Next up is tightening-up the SSH configuration.
shell$ sudo vi /etc/ssh/sshd_configInside this file you will do three things:
- Change the port from 22 to some other number (such as 52846 in the example below).
- Disable password authentication, so that a private key must be used to login to the server.
- Block the root user from ssh access to your host.
The file therefore needs to contain the following lines (make sure all other entries with these names are commented-out).
Port 52846
PasswordAuthentication no
PermitRootLogin no
Restart the ssh daemon to pick up the changes you just made.
shell$ sudo /sbin/service sshd restartThe next step is to setup a firewall to restrict incoming traffic to just ssh and HTTP. To do this create a file called vm-iptables.sh with the following content. You’ll be executing the following commands as root.
#!/bin/bash

# Flush all current rules from iptables
iptables -F

# Allow SSH and HTTP connections
iptables -A INPUT -p tcp --dport 52846 -j ACCEPT
iptables -A INPUT -p tcp --dport 80 -j ACCEPT

# Drop traffic on all other inbound ports
iptables -P INPUT DROP
iptables -P FORWARD DROP

# Allow all outbound traffic
iptables -P OUTPUT ACCEPT

# Accept any connection on the local port
iptables -A INPUT -i lo -j ACCEPT

# Accept packets belonging to established and related connections
iptables -A INPUT -m state --state ESTABLISHED,RELATED -j ACCEPT

# Save the iptables
/sbin/service iptables save

# List
iptables -L -v
After you’ve created the file, make it an executable and execute it to save your rules.
shell$ chmod +x ./vm-iptables.sh
shell$ sudo ./vm-iptables.sh
iptables: Saving firewall rules to /etc/sysconfig/iptables:[  OK  ]
Chain INPUT (policy DROP 0 packets, 0 bytes)
 pkts bytes target     prot opt in     out     source               destination
    2   104 ACCEPT     tcp  --  any    any     anywhere             anywhere            tcp dpt:ssh
    0     0 ACCEPT     tcp  --  any    any     anywhere             anywhere            tcp dpt:http
    0     0 ACCEPT     all  --  lo     any     anywhere             anywhere
    0     0 ACCEPT     all  --  any    any     anywhere             anywhere            state RELATED,ESTABLISHED

Chain FORWARD (policy DROP 0 packets, 0 bytes)
 pkts bytes target     prot opt in     out     source               destination

Chain OUTPUT (policy ACCEPT 2 packets, 264 bytes)
 pkts bytes target     prot opt in     out     source               destination
The output shows your new iptables configuration which reflects the rules we saved in myvm-iptables.sh.
Install and start Nginx
Add the EPEL yum repository into your configuration:
shell$ sudo rpm -Uvh http://dl.fedoraproject.org/pub/epel/6/x86_64/epel-release-6-7.noarch.rpmInstall Nginx using yum:
shell$ sudo yum install nginxSetup Nginx so that it auto-starts at system start time:
shell$ sudo chkconfig nginx onStart Nginx:
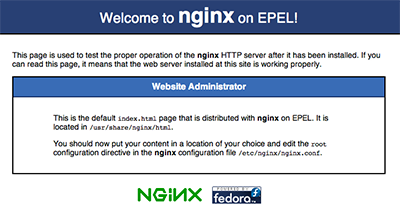
shell$ sudo /sbin/service nginx startYou can test that Nginx is up and running by pointing your browser at your VM IP address - you should see a page confirming that all is good.
Install Jekyll
The following commands will install Jekyll on your VM:
shell$ sudo yum install gcc rubygems ruby-devel
shell$ sudo gem install jekyll
Install Pygments (for code syntax highlighting)
shell% sudo yum install python-setuptools
shell$ sudo easy_install Pygments
Create a crontab entry and script to generate the blog
We’re going to setup Jekyll to write to the Nginx HTML directory, and since we’re going to do this as the bloguser user, we’ll first need to wipe-out the contents of that directory, and chown it so that the bloguser can write to it:
shell$ sudo rm -rf /usr/share/nginx/html/*
shell$ sudo chown bloguser:bloguser /usr/share/nginx/html
We’ll assume that you have a GitHub repository that’s hosting your Jekyll sources. Therefore you need to install git.
shell$ sudo yum install gitCreate a directory to contain your blog source
shell$ sudo mkdir -p /app/blog
shell$ sudo chown bloguser:bloguser /app/blog
The script will send out an email if an error is encountered, so you need to install mail:
shell$ sudo yum install mailxNext on our list is creating a script which will do the following:
- Pulls the latest blog sources from GitHub.
- Uses Jekyll to generate the HTML for the blog.
- Sends an email if Jekyll exits with an error, or if the home page can’t be retrieved
Create a shell script in /app/blog/gen.sh:
shell$ vi /app/blog/gen.shCopy the following content into this file, which clones your github repo for the first time if it doesn’t already exist, or updates the local copy via the pull command:
#!/bin/bash

send_email_and_exit() {
  recipient=$1
  message=$2

  echo "Sending email and exiting due to error"

  /bin/mail -s "Blog generation failure" "${recipient}" << EOF
${message}
EOF

  exit 1
}

echo "Running at "`date`

basedir=/app/blog
gitdir=${basedir}/blog
nginxdir=/usr/share/nginx/html
githubrepo=https://github.com/alexholmes/blog.git
emailto="grep.alex@gmail.com"

if [ ! -d ${gitdir} ]; then
  echo "Checking out repo for the first time"
  mkdir -p ${gitdir}
  cd ${basedir}
  git clone ${githubrepo}
else
  cd ${gitdir}
  git pull
fi

cd ${gitdir}

rm -rf ${nginxdir}/*
jekyll --no-auto . ${nginxdir}/

exitCode=$?

if [ ${exitCode} != "0" ]; then
  send_email_and_exit "${emailto}" "Jekyll failed with exit code ${exitCode}"
fi

curl http://0.0.0.0:80/ >/dev/null 2>&1

exitCode=$?

if [ ${exitCode} != "0" ]; then
  send_email_and_exit "${emailto}" "Curl failed with exit code ${exitCode}"
fi
Make the file executible:
shell$ chmod +x /app/blog/gen.shNow all you need is a crontab entry to refresh your blog every 5 minutes:
shell$ crontab -e
*/5 * * * * /app/blog/gen.sh &>> /app/blog/gen.out
To check your crontab settings use the -l option:
shell$ crontab -l
*/5 * * * * /app/blog/gen.sh &>> /app/blog/gen.out
Now you can either wait for up to 5 minutes for the cron to execute the script, or simply run it yourself:
shell$ /app/blog/gen.shNow when you refresh your browser you’ll see your Jekyll-generated website!
About the author


Alex Holmes works on tough big-data problems. He is a software engineer, author, speaker, and blogger specializing in large-scale Hadoop projects. He is the author of Hadoop in Practice, a book published by Manning Publications. He has presented multiple times at JavaOne, and is a JavaOne Rock Star.
If you want to see what Alex is up to you can check out his work on GitHub, or follow him on Twitter or Google+.
RECENT BLOG POSTS
-
Configuring memory for MapReduce running on YARN
This post examines the various memory configuration settings for your MapReduce job.
-
Big data anti-patterns presentation
Details on the presentation I have at JavaOne in 2015 on big data antipatterns.
-
Understanding how Parquet integrates with Avro, Thrift and Protocol Buffers
Parquet offers integration with a number of object models, and this post shows how Parquet supports various object models.
-
Using Oozie 4.4.0 with Hadoop 2.2
Patching Oozie's build so that you can create a package targetting Hadoop 2.2.0.
-
Hadoop in Practice, Second Edition
A sneak peek at what's coming in the second edition of my book.